How to create an Approval Workflow in SharePoint online
The Approval workflow route the document or item from a list or library to assigned approvers for the approval.
SharePoint online comes with built in out of the box workflow templates.
Let’s see how we can create a simple approval workflow.
Prerequisites
1. You must have manage lists permission to add a workflow to a document library, list, or content type.
2. Go to Site settings> Site collection features and make sure Workflows feature is activated.
Steps to follow
1. Go to the library where you would like to add your approval workflow.
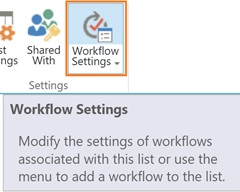
2. Click on Workflow Settings ribbon under List tab on top toolbar.
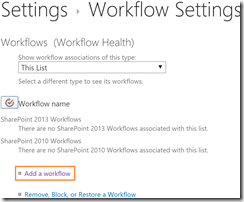
3. On Workflow Settings page, click Add a workflow
4. On Add a Workflow page, select Approval – SharePoint 2010 workflow. you can see SharePoint online has the same workflow types available as SharePoint 2010.
5. Provide a unique name to your workflow. You can leave default options selected for Task List and History List.
6. Select start options of the workflow. Check Creating a new item will start the workflow and click Next button.
7. On next page, you will be able to setup your workflow behaviour e.g. approvers and messages etc.
- Approvers: Provide the name of the approvers here. Click on Add a new stage if you want to add more approvers.
- Order: Select the order for the approval messages.
- Request: Provide your message to be sent to approvers with the request.
- Due Date for All Tasks: Set a due date for all tasks here
- Duration Per Task: You can set the task expiry duration based on number of days, weeks, or months.
- CC: All the task related emails will be CC’d to the email address provided here.
- End on First Rejection: Workflow can be rejected or continued after rejection based on this setting.
- End on Document Change: Workflow item will be automatically rejected if it’s changed during the workflow process based on this settings.
- Enable Content Approval: Items will be marked approved if you have setup content approval on your list/ library.
8. Click Save button to save the settings and setup the workflow.
9. This will take you back to workflow settings page.
10. On workflow settings page, you can see your workflow. You can also update your workflow settings by clicking on your workflow name.


Hi,
We tried to follow all your advice but we’re unable to find the feature in a library in Sharepoint Online.
do we need to have Sharepoint Server as well?
Or are there different versions of Sharepoint Online?
Hi Olivier,
Nops, you don’t need a SharePoint server. That’s the idea of being on SharePoint online.
Did you check the Prerequisites from the article? Please make sure you have the right permissions to create the workflow.
When you open the SharePoint library, you will find 3 tabs on top bar – BROWSE, FILES, LIBRARY.
The feature should be sitting under the Library tab.
If it’s not there – make sure you have activated the workflow feature from site settings
1. Go to site settings > under site collection administration
2. Site collection features > find the workflow feature.
3. Enable the workflow feature.
Let me know if that helps 🙂
Thanks
Hi Cloudie,
Thanks for responding.
It looks like I don’t have the same menus. I can’t find what you mention in the prerequisites, nor can I see what’s displayed in your screenshots.
Did you try to use your article on a recent Office 365 account?
How do you setup a workflow that needs to go to 2 people for approval but only one person has to approve it? There are 2 people responsible in the work area so both need to receive the notifications but only one is required to approve it.
Hi Stephanie,
Select “All at once (parallel)” under ORDER and notification will go to everyone in “Assign To” column / field. Who ever approves, workflow will be approved.
Hi Cloudie,
Thanks for the helpful post. I want to create a workflow with 2 parallel operators,one for filling the form and one as reviewer. each form has several sections will be filled in several steps by the first operator and the second one will review it. Then the forms will be send to the manger and then director (in sequence).I need your helpful comments to create the in-built workflow.
Thanks
Abbas